
Singer 401A Sewing Machine Manual: A Comprehensive Guide
This guide offers detailed instructions, troubleshooting, and maintenance for the Singer 401A. PDF versions of the manual are readily available online for easy access.
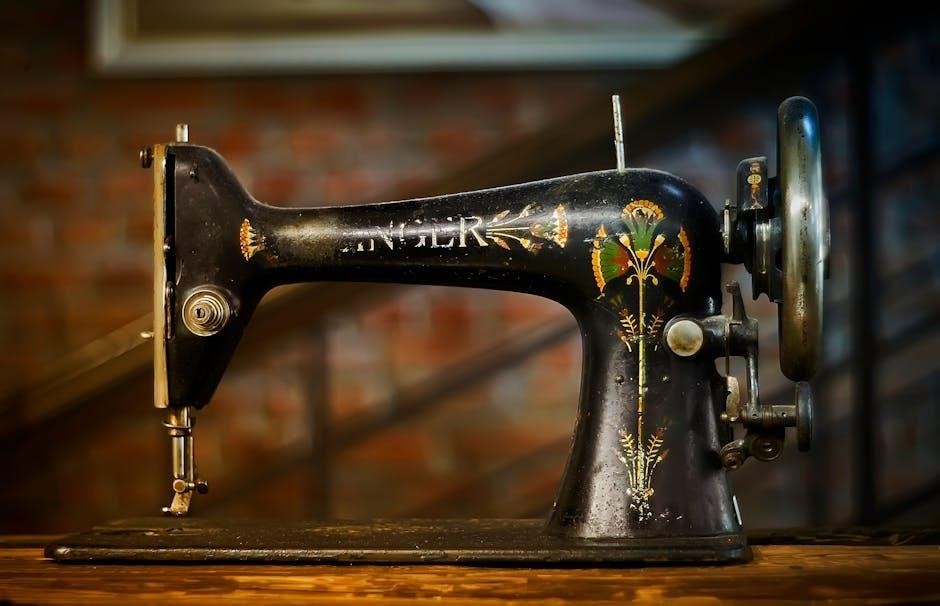
The Singer 401A, often called the “Slant-O-Matic,” represents a pinnacle of domestic sewing machine engineering. Introduced in 1958, it quickly gained popularity for its robust construction, versatility, and innovative features. This machine wasn’t just a tool; it was a statement of modern homecraft.
Many users seek out the Singer 401A manual to unlock its full potential, as original documentation can be invaluable for both operation and repair. Online resources provide PDF downloads of the manual, offering detailed instructions and diagrams. The machine’s enduring appeal stems from its ability to handle a wide range of fabrics and sewing tasks, from simple alterations to complex garment construction. Understanding its components and functions, as outlined in the manual, is key to enjoying years of reliable service.
Historical Significance of the 401A
The Singer 401A arrived during a transformative period in American home life, reflecting a surge in domestic creativity and a desire for quality craftsmanship. Released in 1958, it quickly became a symbol of modern sewing technology. Its slant-shank design, a departure from previous models, allowed for improved visibility and easier needle threading.
The availability of the Singer 401A manual – both originally and now in PDF format online – contributed to its widespread adoption. This accessibility empowered home sewers to maintain and repair their machines independently. The 401A’s durability and reliability ensured its longevity, making it a cherished heirloom for many families. Today, vintage Singer 401A machines are highly sought after by collectors and sewing enthusiasts alike, a testament to its enduring legacy.
Key Features and Specifications
The Singer 401A boasts a robust, fully mechanical construction, renowned for its dependability. Key features include a versatile zigzag stitch, adjustable stitch length and width, and a reverse mechanism. It operates on a 110-volt power supply and accommodates System 15 needles.
The machine’s specifications, detailed in the Singer 401A manual, highlight its ability to handle a wide range of fabrics, from lightweight silks to heavy denim. Its free-arm capability simplifies sewing cuffs and sleeves. Numerous online resources offer PDF versions of the manual, detailing these specifications. The 401A’s solid build and comprehensive features made it a favorite among serious home sewers, ensuring its continued popularity today.
Understanding the Machine Components
Detailed diagrams within the Singer 401A manual illustrate each part, from the needle clamp to the handwheel, aiding in identification and maintenance.
Identifying Major Parts
The Singer 401A boasts a robust construction, and understanding its components is crucial for operation and repair. Key parts, as detailed in the manual, include the handwheel, used for manual control, the presser foot lever, adjusting pressure, and the needle clamp securing the needle.
The feed dogs, responsible for fabric movement, are clearly shown, alongside the bobbin case and cover. The tension discs regulate thread flow, while the stitch length dial controls stitch size. The reverse lever allows for backstitching, and the spool pin holds the thread spool.
The manual’s illustrations pinpoint the location of the motor, belt, and various screws. Familiarizing yourself with these elements, as presented in the PDF, will greatly simplify maintenance and troubleshooting efforts. Knowing each part’s function is paramount for successful sewing.
Needle and Presser Foot System
The Singer 401A’s needle system is designed for optimal performance with specific needle types, detailed in the manual. Correct needle selection – size and type – is vital for different fabrics. The needle clamp securely holds the needle, ensuring stability during operation.
Presser feet play a crucial role in fabric handling. The standard zig-zag foot is versatile, while specialized feet, often discussed in online forums, cater to specific tasks like buttonholes or zippers. Adjusting presser foot pressure, via the lever, impacts stitch quality.
The manual illustrates proper needle insertion and explains how to change presser feet. Maintaining the correct alignment between needle and presser foot is essential for preventing skipped stitches and ensuring smooth fabric feed. Referencing the PDF guide is highly recommended.
Bobbin Winding and Insertion
The Singer 401A utilizes a unique bobbin winding system. The manual provides clear, illustrated steps for winding the bobbin evenly, crucial for consistent stitch quality. Proper tension during winding prevents loose or overly tight bobbin thread. Online resources, including PDF guides, demonstrate this process visually.
Bobbin insertion requires careful attention. The manual details the correct orientation and placement of the bobbin within the bobbin case. Ensuring the thread flows correctly through the tension spring is vital. Incorrect insertion leads to tangled thread and inconsistent stitches.
Regularly cleaning the bobbin area, as outlined in the manual, prevents lint buildup. This ensures smooth bobbin rotation and reliable performance. Consult the manual or online communities for troubleshooting bobbin-related issues.
Tension Control Mechanisms
The Singer 401A features both upper and lower tension controls, vital for balanced stitches. The manual explains how to adjust the upper tension dial to achieve optimal thread balance with different fabric weights and thread types. Incorrect tension causes looping or puckering.
Lower tension is controlled by the bobbin case spring. The manual details how to carefully adjust this spring, though it’s typically pre-set. Online PDF guides offer visual aids for understanding tension adjustments. Maintaining proper tension is key to stitch quality.
Troubleshooting tension issues is covered in the manual. Common problems, like thread nests, often stem from incorrect tension settings. Regular cleaning, as described in the manual, prevents lint from affecting tension.
Setting Up Your Singer 401A
The manual guides initial setup, threading, bobbin winding, and needle selection for optimal performance. PDF versions simplify this process.
Initial Machine Setup
Before beginning to sew, ensure your Singer 401A is properly set up for safe and efficient operation. Begin by placing the machine on a stable, level surface with adequate lighting. Remove the cover and inspect all parts, verifying they are present and in good working order.
Consult the manual (available as a PDF download) for a detailed diagram of the machine’s components. Ensure the handwheel is facing you and that the bobbin case is correctly installed. The presser foot should be lowered before threading to maintain proper tension.
Familiarize yourself with the location of key controls, such as the stitch length dial, stitch width dial, and reverse lever. A thorough understanding of these controls, as outlined in the manual, will greatly enhance your sewing experience. Proper initial setup is crucial for achieving consistent stitch quality.
Threading the Machine
Correct threading is vital for the Singer 401A’s performance. Begin by raising the presser foot; this opens the tension discs, allowing the thread to seat properly. Refer to the manual’s threading diagram – often available as a PDF – for a visual guide.
Place the spool of thread on the spool pin, securing it with a spool cap. Guide the thread through the first thread guide, then down and around the tension discs; Continue threading through the take-up lever, ensuring it’s in its highest position.
Next, thread the needle from front to back. Finally, draw a length of thread through the needle eye. Incorrect threading leads to skipped stitches or tension issues, so double-check each step against the manual’s illustrations for optimal results.
Winding the Bobbin
Winding the bobbin on your Singer 401A is a straightforward process, crucial for consistent stitching. First, place the spool of thread on the spool pin and secure it. Engage the bobbin winder by sliding it to the right. Then, thread the thread through the tension disc and guide it to the bobbin.
Place an empty bobbin onto the bobbin winder spindle. Press the foot pedal gently to start winding; the machine will automatically stop when the bobbin is full. Disengage the bobbin winder and remove the bobbin.
Consult the Singer 401A manual (often found as a PDF online) for detailed diagrams. Proper bobbin winding ensures even thread distribution and prevents issues during sewing.
Selecting the Correct Needle

Choosing the right needle for your Singer 401A is vital for optimal sewing performance and preventing fabric damage. The Singer 401A manual details needle sizes and types for various fabrics. Universal needles (size 14 or 16) work well for medium-weight fabrics.
For delicate fabrics like silk or chiffon, use a smaller needle (size 9 or 11). Heavier fabrics, such as denim, require a larger needle (size 18 or 19). Ballpoint needles are best for knit fabrics, preventing skipped stitches. Always replace needles regularly, as dull needles can cause thread breakage and poor stitch quality.
PDF versions of the manual often include a needle guide chart for quick reference.

Basic Sewing Operations
Mastering straight and zigzag stitches is fundamental. The Singer 401A manual guides adjusting stitch length and width, plus reverse sewing techniques.
Straight Stitching
Achieving a perfect straight stitch with your Singer 401A begins with proper threading and needle insertion, as detailed in the manual. Ensure the fabric is aligned with the presser foot markings for consistent seam allowances.
Begin by lowering the feed dogs and gently guiding the fabric; avoid pulling or pushing. The manual emphasizes selecting the appropriate needle size for your fabric weight – finer fabrics require finer needles. Adjust stitch length using the designated dial, experimenting to find the optimal setting for your project.
Consistent pressure on the foot pedal is crucial for even stitching. Practice on scrap fabric to refine your technique before tackling your final project. The Singer 401A’s robust mechanics, when properly maintained, deliver remarkably straight and even seams.
Zigzag Stitching
The Singer 401A excels at zigzag stitching, offering versatility for various applications. Consult your manual to correctly set the stitch width and length dials. Wider stitches are ideal for decorative edging, while narrower stitches reinforce seams.
Experiment with different settings on scrap fabric to understand the effect of each adjustment. The manual details how to adjust the zigzag width for overcasting raw edges, preventing fraying. Ensure the presser foot is appropriate for zigzag stitching; a zigzag foot allows fabric to move freely.
Consistent speed and gentle guidance are key to achieving even zigzag lines. The Singer 401A’s precision mechanics, combined with proper setup, produce professional-looking zigzag stitches.
Adjusting Stitch Length and Width
The Singer 401A’s stitch length and width are controlled by dedicated dials, clearly explained in the manual. Stitch length determines the distance between each stitch; shorter lengths create denser seams, ideal for fine fabrics. Longer lengths are suitable for basting or heavier materials.
Stitch width, particularly crucial for zigzag stitches, controls the breadth of the stitch. The manual illustrates how to adjust width for decorative effects or functional purposes like overcasting. Always test settings on scrap fabric before sewing your project.
Precise adjustments ensure fabric compatibility and seam strength. Refer to the manual’s guidelines for recommended settings based on fabric type and desired outcome.
Reverse Sewing Techniques
The Singer 401A utilizes a dedicated lever or button for reverse sewing, detailed in the manual. This function is essential for securing seams at the beginning and end, preventing unraveling. Engage the reverse mechanism before reaching the seam’s edge, and sew backwards for a short distance – typically ¼ to ½ inch.
The manual emphasizes smooth transitions between forward and reverse. Avoid abrupt changes, as this can cause bunching or broken threads. Practice on scrap fabric to master the technique. Consistent backstitching creates a robust and professional finish.
Proper reverse sewing reinforces stress points, enhancing garment durability. Consult the manual for specific recommendations based on fabric weight and seam type.
Advanced Sewing Techniques
The Singer 401A manual details complex operations like buttonholes, zippers, darning, and free-motion sewing, expanding your creative possibilities.
Buttonhole Creation
The Singer 401A excels at creating durable and professional-looking buttonholes, a feature highlighted in its comprehensive manual. Achieving perfect buttonholes requires precise settings and understanding the machine’s capabilities. The manual provides step-by-step instructions, detailing the correct presser foot and stitch settings for various buttonhole sizes.
Users will learn to adjust the buttonhole length and width, ensuring a snug yet functional fit for their buttons. The guide emphasizes the importance of practicing on scrap fabric to master the technique before working on final projects. It also covers troubleshooting common issues, such as uneven stitching or buttonhole jams, offering clear solutions to maintain optimal performance. Properly utilizing the buttonhole features of the 401A elevates garment construction to a professional level.
Zipper Insertion
The Singer 401A manual dedicates specific sections to mastering zipper insertion, a skill crucial for garment construction. It details several techniques, including centered, overlapped, and invisible zipper applications. Clear diagrams and instructions guide users through each step, from preparing the fabric to securing the zipper tape.
The manual emphasizes the importance of using the correct presser foot – typically a zipper foot – to achieve precise stitching close to the zipper teeth. It also provides guidance on adjusting stitch length and tension for optimal results. Troubleshooting tips address common challenges like puckering or uneven zipper alignment. Successfully inserting zippers with the 401A ensures professional-quality finishes and durable garment construction.
Darning and Mending
The Singer 401A manual showcases its versatility with detailed darning and mending instructions. These techniques extend the life of garments and fabrics, offering economical repair solutions. The manual explains how to utilize the machine’s zigzag stitch for reinforcing worn areas and covering holes.
Specific guidance is provided for darning socks, repairing tears in woven fabrics, and patching denim. Lowering the feed dogs is often recommended for freehand mending, allowing for greater control. The manual stresses the importance of matching thread color and weight for inconspicuous repairs. Mastering these skills with the 401A promotes sustainability and resourcefulness in textile care;
Free Motion Sewing
The Singer 401A manual details how to achieve free motion sewing, a technique unlocking creative possibilities; This involves disengaging the feed dogs, allowing the user to move the fabric freely under the needle. The manual emphasizes the need for a darning foot, which facilitates smooth fabric movement.
It explains adjusting stitch length to zero and regulating speed with the foot pedal for controlled designs. Free motion is ideal for quilting, embroidery, and creating decorative stitches. The manual suggests practicing on scrap fabric to develop consistent movement. Mastering this skill transforms the 401A into a versatile artistic tool, expanding beyond standard sewing applications.

Maintenance and Troubleshooting
The Singer 401A manual provides guides for cleaning, lubrication, and resolving common issues like belt replacement, ensuring longevity and optimal performance.
Regular Cleaning Procedures
Maintaining your Singer 401A requires consistent cleaning to prevent lint buildup and ensure smooth operation. Begin by disconnecting the power source. Use a soft brush, or compressed air, to remove lint from the bobbin area, feed dogs, and surrounding mechanisms.
Pay close attention to the needle plate and shuttle race, as these areas accumulate lint quickly. A small amount of sewing machine oil can be applied sparingly to these parts after cleaning. Wipe down the exterior surfaces with a damp cloth, avoiding harsh chemicals.
Regularly cleaning the machine, ideally after each use or every few projects, will significantly extend its lifespan and maintain consistent stitch quality. Refer to the Singer 401A manual for detailed diagrams and specific cleaning recommendations.
Lubrication Guide
Proper lubrication is crucial for the longevity and performance of your Singer 401A. Use only sewing machine oil specifically designed for this purpose; avoid household oils. Key lubrication points include the motor bearings, shuttle hook, and any moving parts identified in the manual.
Apply oil sparingly, using a needle oiler for precision. Over-oiling can attract lint and create a sticky residue. After oiling, operate the machine slowly for a few minutes to distribute the oil evenly.
Consult the Singer 401A service manual for detailed diagrams illustrating the exact lubrication points. Regular oiling, typically every six months or after extended use, will ensure smooth, quiet operation and prevent wear and tear.
Common Problems and Solutions
Thread bunching often indicates incorrect threading or tension issues; re-thread the machine and adjust the tension dials. Skipped stitches can stem from a dull or incorrect needle, or improper timing – replace the needle and consult the service manual for timing adjustments.
If the machine is making excessive noise, check for lint buildup or lack of lubrication. A broken belt will require replacement, and instructions are available in the manual.
For more complex issues, online forums and communities dedicated to the Singer 401A offer valuable troubleshooting advice and support. Always disconnect the power before attempting any repairs.
Belt Replacement Instructions
Disconnect the power before starting. Remove the access panel on the rear of the machine to expose the motor and belt. Carefully note the belt’s routing around the motor pulley and handwheel before removal.
Loosen the motor mounting screws to create slack for belt installation. Install the new belt, ensuring it’s seated correctly in the grooves of both pulleys. Tighten the motor mounting screws, verifying proper belt tension – it should have slight give.
Refer to the Singer 401A service manual for detailed diagrams and torque specifications. Reattach the access panel and test the machine.

Resources and Further Information
Explore online forums, PDF manuals, and parts suppliers for the Singer 401A. Dedicated communities offer support and valuable resources.

Finding the Singer 401A Manual (PDF Download)
Locating a digital copy of the Singer 401A sewing machine manual is surprisingly straightforward in today’s digital age. Several websites archive these valuable resources, offering free PDF downloads.
ISMacs is a frequently cited source, providing links to various versions of the manual. Be aware that some paid versions available elsewhere may not offer significantly more content than the free options. The Singer company itself occasionally hosts manuals on their website, though availability can vary.
Searching online using keywords like “Singer 401A manual PDF” will yield numerous results. Always exercise caution when downloading files from unfamiliar sources to protect your device from potential malware. Ensure the PDF is complete, as some found online may only contain sections of the full manual.
Online Forums and Communities
Engaging with online forums and sewing communities dedicated to vintage machines is an invaluable resource for Singer 401A owners. These platforms offer a wealth of knowledge, shared experiences, and troubleshooting assistance from fellow enthusiasts.
Members frequently share manuals, diagrams, and tips for maintaining and repairing these classic machines. You can pose specific questions about your 401A and receive detailed responses from experienced users.
These communities are excellent for identifying parts, understanding complex mechanisms, and learning advanced techniques. ISMacs often links to relevant forum discussions. Active participation can significantly enhance your understanding and enjoyment of your Singer 401A, fostering a collaborative learning environment.
Parts Suppliers and Availability
Finding replacement parts for the Singer 401A requires exploring specialized suppliers catering to vintage sewing machines. While Singer no longer directly supports parts for this model, numerous vendors maintain inventories of original and reproduction components.

Online marketplaces like eBay often feature listings from individual sellers and dedicated parts dealers. Websites specializing in vintage Singer parts are also readily available, offering a comprehensive selection of belts, bobbins, needles, and more complex mechanisms.
Availability can vary, so patience and diligent searching are often necessary. Checking forums and communities can reveal reliable suppliers and potential sources for hard-to-find parts, ensuring your 401A remains operational for years to come.
Service Manual Information
The Singer 401A service manual provides in-depth technical details crucial for complex repairs and maintenance beyond basic user procedures. It details disassembly, reassembly, and troubleshooting steps for experienced technicians or dedicated hobbyists.
Locating a genuine service manual can be challenging, but digital copies are often available online through vintage sewing machine enthusiast communities and dedicated websites. These manuals typically include detailed diagrams, parts lists, and precise specifications.
Understanding the service manual requires a foundational knowledge of sewing machine mechanics; It’s not intended as a beginner’s guide, but rather a resource for those comfortable with intricate repairs and adjustments, ensuring optimal performance.