
Castle Darkmoor: A Comprehensive Guide (Updated 05/04/2026)
Welcome, adventurers! This guide provides essential insights into navigating and conquering Castle Darkmoor, leveraging translation tools and resources for a successful expedition.
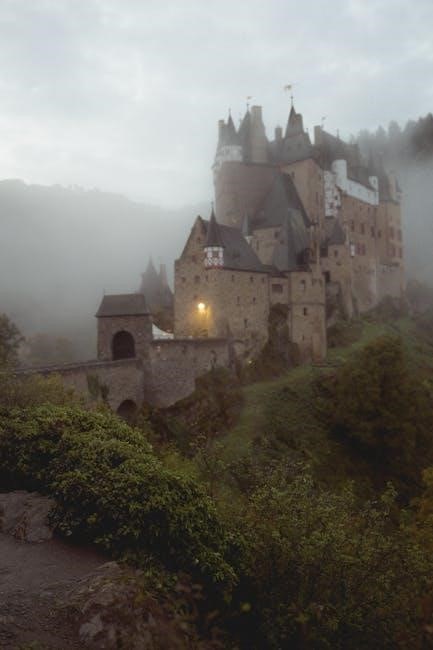
Embark on a perilous journey! Castle Darkmoor stands as a formidable bastion of shadow and mystery, beckoning brave adventurers to test their mettle against its ancient defenses and lurking horrors. This guide serves as your indispensable companion, offering crucial insights gleaned from diverse linguistic resources – from German-English dictionaries like PONS and LEO.org, to translation services such as Google Translate and DeepL – ensuring clear understanding of lore and strategic advantages.
Understanding the castle’s history and the challenges within requires diligent research and accurate interpretation. Utilizing online tools allows for precise translations of ancient texts and deciphering cryptic clues. Prepare to confront goblins, skeletons, Dark Knights, and the formidable Darkmoor Guardian. Success hinges on strategic character builds, effective combat tactics, and skillful utilization of the environment. This guide will empower you to navigate the castle grounds, unlock its secrets, and claim its treasures!
What is Castle Darkmoor?
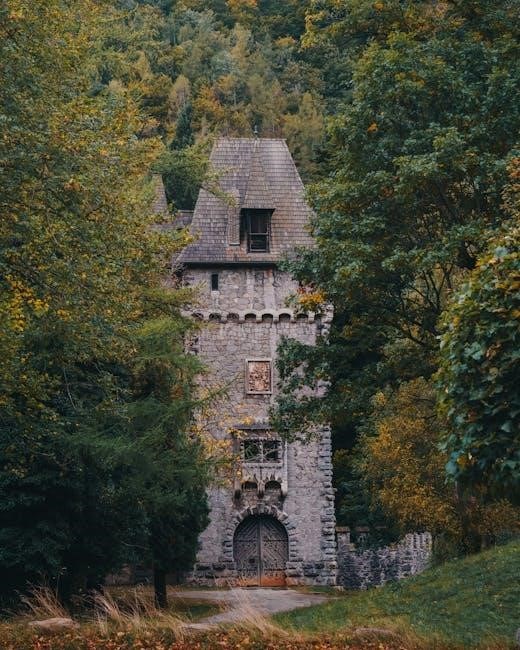
A fortress steeped in darkness, Castle Darkmoor is an imposing structure rumored to have been built by a long-forgotten order of necromancers. Its stone walls echo with tales of betrayal, forbidden experiments, and a lingering curse. Modern adventurers seek it for the legendary artifacts hidden within, but few return unscathed. Accessing information about the castle necessitates utilizing translation tools – dict.cc, for example – to decipher fragmented historical accounts originally penned in various languages.
The castle isn’t merely a physical location; it’s a nexus of magical energy, attracting both powerful creatures and desperate treasure hunters. Understanding its purpose requires piecing together clues from diverse sources, leveraging the precision of DeepL and the breadth of Google Translate. It’s a labyrinthine complex, filled with traps, puzzles, and guarded by relentless enemies. Prepare for a challenging experience demanding both skill and knowledge!
Darkmoor’s Lore and History
The origins of Castle Darkmoor are shrouded in mystery, predating many known kingdoms. Legends speak of Archmage Zarthus, a scholar obsessed with immortality, who commissioned its construction centuries ago. He sought to unlock the secrets of life and death, conducting gruesome experiments within its walls. Early texts, requiring translation via LEO.org, detail Zarthus’s descent into madness and his eventual downfall, supposedly at the hands of his own creations.
Following Zarthus’s demise, the castle fell into disrepair, becoming a haven for bandits and dark creatures. Attempts to reclaim it were consistently met with failure, reinforcing its reputation as a cursed place. Modern scholars utilize PONS Online Dictionary to interpret ancient runes found near the castle, revealing hints of a powerful artifact hidden within – the ‘Heart of Aethel’. Understanding this history, aided by online resources, is crucial for navigating Darkmoor’s treacherous depths.

Navigating the Castle Grounds
Prepare for a perilous journey! Careful exploration, utilizing translated texts, is vital for survival within Darkmoor’s expansive and dangerous outer perimeter.
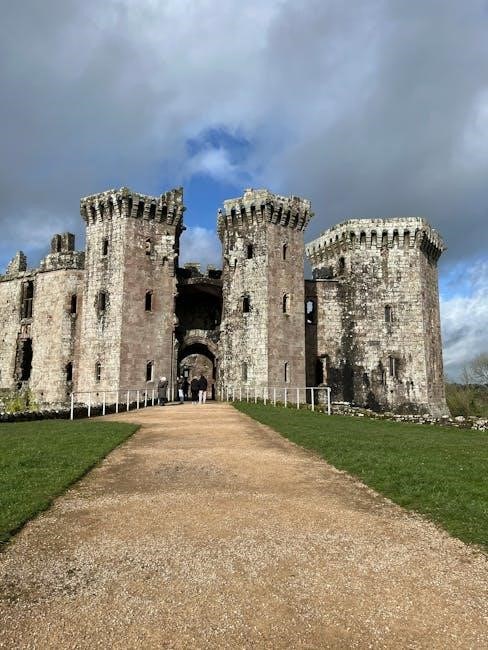
The Outer Courtyard
First Impressions & Initial Threats: The Outer Courtyard of Castle Darkmoor serves as the initial gauntlet for any aspiring hero. Expect a sprawling, dilapidated area patrolled by numerous, relatively weak, but persistent goblin patrols. These creatures, while individually manageable, often attack in swarms, overwhelming unprepared adventurers.
Strategic Considerations: Utilize the crumbling architecture for cover, employing ranged attacks whenever possible. Be mindful of potential ambushes from broken towers and overgrown foliage. Translation tools can help decipher ancient warnings etched into the stonework, hinting at hidden pathways or trap locations.
Resource Gathering: Scavenging the courtyard can yield basic supplies – broken weaponry, damaged armor, and a few consumable potions. However, prioritize survival over loot collection in this initial zone. Understanding the local language, aided by online dictionaries, might reveal clues to hidden stashes.

The Inner Bailey
A Shift in Resistance: Beyond the Outer Courtyard lies the Inner Bailey, a significantly more fortified area. Here, the goblin presence diminishes, replaced by disciplined skeletal warriors and the occasional roaming Darkmoor Hound. Expect a noticeable increase in enemy strength and tactical awareness. The architecture transitions to more intact structures, offering both cover and potential chokepoints.
Navigational Challenges: The Bailey is a labyrinthine network of corridors and small plazas. Utilizing map-making skills or referencing external guides is highly recommended. Deciphering faded inscriptions – potentially aided by translation services – may reveal shortcuts or hidden chambers.
Heightened Alertness: Be prepared for coordinated attacks and the deployment of rudimentary traps. Careful observation and a cautious approach are crucial for survival. Resource gathering becomes more fruitful, yielding better quality armor fragments and potentially magical components.
The Garrison and Barracks
Echoes of a Fallen Order: The Garrison and Barracks represent the heart of Darkmoor’s former military strength. Though now overrun, remnants of the castle’s defenders – primarily Dark Knights – still patrol these halls. Expect heavily armored opponents wielding powerful, albeit decaying, weaponry. The area is characterized by long corridors, training rooms, and dilapidated sleeping quarters.
Strategic Importance: Controlling the Garrison provides a tactical advantage, offering elevated positions for ranged combat and access to supply caches. However, it’s also a hotspot for enemy reinforcements. Careful clearing and establishing defensive perimeters are essential.
Linguistic Clues: Scattered throughout the barracks are journals and orders, potentially requiring translation to uncover valuable information about enemy patrol routes or hidden armories. Deciphering these texts could reveal weaknesses in the Dark Knight’s defenses.
The Training Grounds
A Crucible of Combat: Once a bustling center for honing Darkmoor’s soldiers, the Training Grounds now stand as a testament to its fall. Expect a challenging environment filled with animated training dummies, spectral warriors reliving past drills, and cleverly concealed traps designed to test reflexes and combat prowess. The grounds consist of obstacle courses, sparring arenas, and weapon racks.
Skill Enhancement: Utilizing the remaining training equipment – though damaged – can temporarily boost character stats, offering a strategic advantage. However, activating these devices often triggers additional enemy encounters.
Deciphering Techniques: Ancient training manuals, potentially requiring translation, are scattered around the grounds. These texts detail unique combat maneuvers and weaknesses of Darkmoor’s former enemies, providing valuable insights for players.
Key Locations Within the Castle
Delve deeper! Explore the heart of Darkmoor, uncovering secrets within the Great Hall, Royal Apartments, Dungeon, and the ancient Library and Scriptorium.
The Great Hall
A Majestic, Yet Foreboding Space: The Great Hall of Castle Darkmoor stands as a testament to a bygone era, though now steeped in shadow and decay. Once the heart of royal gatherings and feasts, it now echoes with the whispers of forgotten kings and the chilling presence of spectral guardians. Massive stone pillars support a vaulted ceiling, adorned with faded tapestries depicting scenes of heroic battles and tragic losses.
Sunlight struggles to penetrate the stained-glass windows, casting eerie patterns across the flagstone floor. A long, imposing table dominates the center of the hall, scarred by centuries of use and now often covered in dust and cobwebs. Be wary, adventurers, as the Hall is frequently patrolled by restless spirits and opportunistic goblins seeking to plunder any remnants of the castle’s former glory. Careful observation of the environment may reveal hidden passages or clues to unlocking the castle’s deeper mysteries. Prepare for challenging encounters within these hallowed, yet haunted, walls.
The Royal Apartments
A Glimpse into Lost Luxury: Ascending to the Royal Apartments offers a stark contrast to the castle’s more dilapidated areas, though time and neglect have taken their toll. These chambers, once reserved for the Darkmoor monarchs, retain vestiges of their former opulence – though now haunted by echoes of past lives and shadowed by an unsettling stillness. Elaborate frescoes, depicting scenes of courtly life and regal power, adorn the walls, though many are cracked and peeling.
Luxurious, though decaying, furnishings remain – a four-poster bed draped with tattered velvet, a vanity cluttered with tarnished silver, and a writing desk covered in dust-laden scrolls. Beware, for the Apartments are fiercely guarded by spectral protectors, remnants of the royal guard sworn to defend their king even in death. Searching these rooms carefully may yield valuable clues, forgotten treasures, or even powerful magical artifacts, but proceed with caution – the spirits here are easily disturbed.
The Dungeon and Catacombs
A Labyrinth of Despair: Descending into the Dungeon and Catacombs is to enter the heart of Castle Darkmoor’s darkness. These subterranean levels, carved deep into the bedrock, served as the castle’s prison and final resting place for its enemies – and, some say, its victims. The air is thick with the stench of decay and despair, and the silence is broken only by the drip of water and the occasional scuttling of unseen creatures.
Expect cramped corridors, flooded chambers, and cells containing the skeletal remains of long-forgotten prisoners. The Catacombs, a sprawling network of tunnels beneath the dungeon, house the tombs of Darkmoor’s nobility, often guarded by undead sentinels or trapped with ancient curses. Powerful artifacts and forbidden knowledge can be found here, but the risks are immense. Prepare for relentless waves of undead, cunning traps, and the chilling presence of something far more sinister lurking in the shadows.
The Library and Scriptorium
A Repository of Lost Knowledge: Unlike the grim depths below, the Library and Scriptorium represent Castle Darkmoor’s intellectual heart. Once a center of arcane study and historical record-keeping, it now stands as a haunting testament to forgotten lore. Dust motes dance in the shafts of light filtering through stained-glass windows, illuminating towering shelves crammed with ancient tomes, scrolls, and forbidden texts.
The Scriptorium, adjacent to the main library, contains the tools and remnants of the castle’s scribes – inkwells, quills, and partially completed manuscripts. While largely undisturbed, the library isn’t without its dangers. Animated guardians protect valuable texts, and the very knowledge contained within can be corrupting. Deciphering the ancient languages and uncovering the secrets hidden within these pages requires caution and a keen intellect. Expect puzzles based on linguistic challenges and magical wards protecting sensitive information.
Enemies and Challenges
Prepare for peril! Darkmoor teems with monstrous foes – goblins, skeletons, dark knights, and wraiths – alongside cunning traps and intricate puzzles awaiting brave adventurers.
Common Enemies: Goblins and Skeletons
Goblins are the most frequently encountered foes within Castle Darkmoor, often appearing in large numbers. These diminutive humanoids rely on swarming tactics and crude weaponry, such as rusty swords and poorly-made bows. While individually weak, their sheer volume can overwhelm unprepared adventurers. Expect erratic movements and a tendency to flee when facing significant resistance. Prioritize area-of-effect attacks to efficiently clear goblin hordes.
Skeletons, animated by dark magic, are another prevalent threat. They are resistant to piercing damage but vulnerable to blunt force and radiant energy. Skeletons move with a deliberate, unsettling gait and attack with brittle bone weapons. Unlike goblins, they exhibit no fear and will relentlessly pursue intruders until destroyed. Be wary of skeletal archers positioned on higher ground, providing ranged support to their brethren. Dismemberment is a viable tactic against these undead creatures.
Elite Enemies: Dark Knights and Wraiths
Dark Knights represent a significant escalation in challenge. Clad in corrupted plate armor, these fallen warriors wield powerful, enchanted weaponry and possess formidable strength. They often employ tactical maneuvers, utilizing shield bashes and devastating cleaving attacks. Dark Knights are resistant to most forms of physical damage and possess a limited ability to absorb magical energy. Disrupting their focus with stuns or silences is crucial for creating openings. Expect them to guard key locations and patrol heavily fortified areas.
Wraiths, spectral entities born of sorrow and malice, pose a different kind of threat. They phase in and out of reality, making them difficult to target consistently. Wraiths drain life force with each attack, weakening adventurers over time. Silver weaponry and radiant damage are particularly effective against these incorporeal beings. Maintaining mobility and avoiding prolonged engagements are vital for survival. Be prepared for chilling wails that can inflict fear.
Boss Encounters: The Darkmoor Guardian
The Darkmoor Guardian, a colossal construct animated by ancient dark magic, serves as the castle’s final defense. This formidable foe boasts immense physical strength, coupled with potent magical abilities. Its attacks include sweeping energy blasts, ground-shaking slams, and the summoning of spectral minions. The Guardian is heavily armored, requiring focused attacks on its weak points – glowing runes located on its back and chest.
The battle unfolds in three distinct phases. Initially, it relies on brute force. Phase two introduces magical attacks and minion summons. The final phase unleashes a devastating, area-of-effect attack requiring precise timing and positioning to avoid. Teamwork is paramount; designated roles for tanking, healing, and damage dealing are essential for victory. Prepare for a prolonged and challenging encounter demanding strategic coordination and resilience.
Traps and Puzzles
Castle Darkmoor is riddled with cunning traps and intricate puzzles designed to deter intruders. Pressure plates trigger dart volleys and collapsing floors, while hidden tripwires unleash swinging blades. Observant players will notice subtle clues – discoloration on the stone, faint etchings, or unusual air currents – hinting at impending danger. Disarming mechanisms often require specific tools or knowledge gleaned from the castle’s lore.
Puzzles range from simple lever combinations to complex riddles demanding linguistic skills and logical deduction. Many involve manipulating ancient mechanisms or deciphering cryptic symbols. Successfully solving these challenges unlocks hidden passages, reveals valuable loot, and disables further traps. Utilizing translation tools can aid in understanding ancient texts crucial for puzzle solutions. Caution and patience are key; hasty actions often lead to unfortunate consequences.

Loot and Rewards
Valuable treasures await those brave enough to explore Darkmoor, including powerful weaponry, magical artifacts, potent consumables, and rare resources for crafting.
Weaponry and Armor
Darkmoor’s armories yield a diverse range of weaponry and armor, catering to various combat styles. Expect to uncover rusted swords alongside exquisitely crafted elven blades, each possessing unique attributes. Armor sets range from basic leather padding offering minimal protection to formidable plate armor imbued with magical resistances.
Rare finds include enchanted weapons with elemental damage, and armor pieces granting increased strength or agility. Look for blacksmithing materials scattered throughout the castle – these are crucial for upgrading existing gear.
Specific weapons like the ‘Shadowfang Dagger’ and ‘Guardian’s Shield’ are highly sought after, offering significant advantages in battle. Remember to check merchant inventories within the castle grounds, as they occasionally stock unique items obtained from previous adventurers. Careful examination of each piece is vital to maximize your combat effectiveness.
Magical Artifacts
Castle Darkmoor conceals a wealth of potent magical artifacts, far beyond simple weaponry. These relics, remnants of a forgotten age, offer extraordinary abilities to those who can locate and attune to them. Expect to find amulets granting spell resistance, rings enhancing magical power, and staffs capable of unleashing devastating arcane energies.
Legend speaks of the ‘Orb of Shadows’, a powerful artifact capable of manipulating darkness itself, and the ‘Amulet of Life’, offering substantial healing properties. However, many artifacts are cursed or guarded by formidable entities, requiring careful planning and execution to acquire.
Identifying these artifacts often requires deciphering ancient texts found within the Library and Scriptorium. Proper understanding of their properties is crucial, as misuse can lead to unforeseen consequences. Utilize translation tools to unlock their secrets!

Consumables and Potions
Survival within Castle Darkmoor hinges on strategic use of consumables and potions. Scattered throughout the castle – within chests, on fallen enemies, and hidden alcoves – are vital resources for sustaining your journey. Healing potions are paramount, ranging from minor salves restoring a few hit points to powerful elixirs capable of full regeneration.
Beyond healing, expect to discover potions granting temporary stat boosts, such as increased strength, agility, or magical resistance. Consumable scrolls containing useful spells, and food items restoring stamina, are also frequently found.
Careful inventory management is essential; prioritize potions based on your character build and anticipated challenges. Translation of alchemical recipes discovered within the castle can unlock the ability to craft superior consumables.
Rare Resources
Castle Darkmoor harbors a wealth of rare resources crucial for crafting powerful equipment and unlocking advanced abilities. These aren’t readily available; diligent exploration and defeating challenging enemies are required to obtain them. Look for shimmering crystals, ancient runes, and fragments of forgotten artifacts hidden within the castle’s depths.
Darkmoor Ore, essential for forging legendary weaponry, is often guarded by elite enemies. Spectral Silk, used in creating potent magical garments, can be harvested from defeated Wraiths. Translation of ancient texts may reveal the locations of hidden resource nodes.
Efficient resource gathering and strategic trading with NPCs are vital for maximizing your potential. Remember to carefully manage your inventory space, prioritizing the most valuable and sought-after materials.
Strategies and Tips for Success
Maximize your chances by understanding enemy weaknesses, utilizing environmental advantages, and coordinating effectively with teammates for optimal results within Darkmoor.
Character Builds for Darkmoor
For optimal Darkmoor performance, consider specialized character builds. A heavily armored Warrior, focusing on strength and constitution, excels against the castle’s numerous physical threats – goblins, skeletons, and even Dark Knights. Prioritize defensive skills and area-of-effect attacks to manage hordes.
Alternatively, a nimble Rogue, emphasizing dexterity and intelligence, can bypass traps and exploit enemy weaknesses with critical strikes and poisons. This build requires precise timing and positioning. Mages, with high intelligence and magical prowess, are invaluable for ranged damage and crowd control, countering Wraiths and the Darkmoor Guardian.
Hybrid builds, combining elements of these classes, offer versatility but may lack specialization. Remember to allocate skill points strategically, focusing on abilities that complement your chosen playstyle and address Darkmoor’s unique challenges. Utilizing translation resources can help decipher enemy lore for strategic advantages.
Effective Combat Tactics
Mastering combat in Castle Darkmoor demands adaptability. Against goblin swarms, prioritize area-of-effect spells or sweeping weapon attacks. Skeletons are vulnerable to blunt force; hammers and maces prove highly effective. Dark Knights require a more tactical approach – exploit openings after their attacks and utilize defensive maneuvers.
Wraiths, being ethereal, are resistant to physical damage; magical attacks are essential. For the Darkmoor Guardian, observe its attack patterns and capitalize on brief vulnerabilities. Dodging is crucial. Employ hit-and-run tactics, utilizing the environment for cover.
Don’t underestimate the power of consumables – potions for healing and buffs can turn the tide. Remember to translate any discovered enemy texts; understanding their weaknesses is paramount to success. Precise timing and strategic positioning are key to survival.
Utilizing the Environment
Castle Darkmoor isn’t just a battlefield; it’s an arena offering strategic advantages. Collapsed sections of walls provide cover from ranged attacks, while narrow corridors funnel enemies, creating chokepoints for focused damage. Be mindful of unstable flooring – some areas may collapse under pressure, potentially hindering enemies or creating new pathways.
The castle’s architecture can be used offensively. Lure enemies beneath chandeliers or precarious stone structures, then trigger their collapse. Utilize the library’s bookshelves for concealment or to create obstacles. Remember to translate any environmental clues – inscriptions might reveal hidden passages or traps.
Darkmoor’s varying elevations offer tactical positioning. Higher ground grants ranged advantage, while lower areas provide cover. Always scan your surroundings for potential environmental interactions; resourcefulness is key to survival.

Group Play and Coordination
Conquering Castle Darkmoor is significantly easier with a well-coordinated team. Assign roles – a tank to draw enemy aggression, damage dealers to focus fire, and a healer to maintain group health. Communication is paramount; utilize voice chat or text channels to relay enemy positions, trap locations, and strategic intentions.
Coordinate ability usage for maximum effect. Combine crowd control abilities to stun or slow enemies, creating openings for powerful attacks. Share consumable resources like potions and scrolls to ensure everyone remains prepared. Remember to translate any discovered lore – shared knowledge strengthens the team.
Prioritize targets strategically. Focus down elite enemies or those posing the greatest threat. Revive fallen teammates quickly to maintain fighting strength. Successful Darkmoor expeditions rely on synergy and mutual support.